Nov 1, 2023
Ceiling Installation Tips for HardieFlex<sup>®</sup> NexGen<sup>™</sup> fiber cement board with MoldBlock<sup>™</sup> Technology
Ceiling Installation Tips for HardieFlex® NexGen™ fiber cement board with MoldBlock™ Technology
When it comes to transforming your living space, one of the key elements often overlooked is the ceiling. A well-installed ceiling not only enhances the overall aesthetics of your room but also provides functional benefits. In this guide, we’ll delve straight into the essential ceiling installation tips for HardieFlex® NexGen™ fiber cement board with MoldBlock™ Technology, ensuring a smooth and successful project.
Installation Procedure
When it comes to turning your vision of a perfect ceiling into reality, a step-by-step guide is your best ally. In this part, we’ll walk you through a precise installation procedure for ceiling installation procedure for HardieFlex® NexGen™ fiber cement board with MoldBlock™ Technology, ensuring hassle-free and professionally finished results.
For Board Installation:
1.Direction Matters: Start by installing the first HardieFlex® NexGen™ board in the direction of the main framing member.

2.Secure it: Fasten the HardieFlex® NexGen™ board securely using the appropriate Hardie™ Drive fastener.

3.No Gaps: As you add the next HardieFlex® NexGen™ board, employ the same method, ensuring there are zero gaps between the HardieFlex® NexGen™ boards.

For Seamless Joint:
1. Apply Jointing Compound Begin by applying a thick layer of Hardie™ Putty Joint Compound at a width of 150mm. Keep the application length to a maximum of 1 meter at a time

2. Tape It: Apply Hardie™ Perforated Paper Tape over the compound, ensuring no voids are present underneath. Scrape off any excess compound.

3. Second Coat: Add a second coat of Hardie™ Putty Joint Compound at a width of 250mm. Apply additional coats as needed to fully seal the tape.

For Express Joint:
1. Preparation: Before installation, apply bond breaker tape along metal furring where board joints will meet.

2. Gap It: Layout the boards with a gap equal to the thickness of the board in between.|

3. Secure Screws: Apply Hardie™ Putty Joint Compound on screw heads for a seamless finish.

Installation Guidelines
To ensure the longevity and quality of your HardieFlex® NexGen™ ceiling, it’s crucial to adhere to specific guidelines that guarantee a secure and visually appealing installation. We outlined the bare essentials that will help you achieve a ceiling that not only looks great but also stands the test of time.
Timber Frame:
Use only seasoned (kiln-dried) timber with a minimum frame width at joists of 38mm.
Steel Frame:
Steel frame thickness should be in the range of 0.5mm to 1.5mm BMT with a minimum width of 38mm. Ensure steel sections are galvanized or zincalume.
Preparation of Frame:
Ensure that the frame is square, straight, and work from a central datum line. Straight frames ensure a flush face for sheeting installation.
Fasteners:
James Hardie recommends proper spacing of fasteners at joints and noggings. Fasteners should be placed 12mm from the edge and 50mm from the corner.
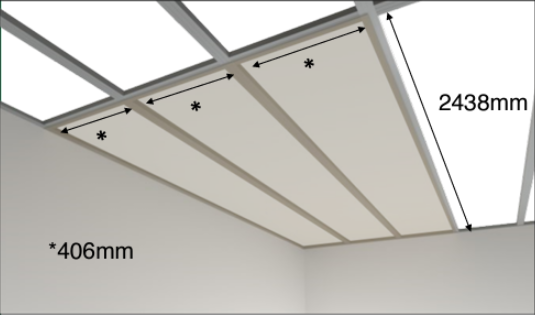
Table 1: Frame & Fastener Spacing (mm) | ||||
Timber | Steel | |||
Joist | Nogging | Joist | Nogging | |
Fastener | 100 | 100 | 200 | 200 |
Frame | 406 | 2438 | 406 | 2438 |
*For steel frames, use Hardie™ Drive Screw 20mm long. For timber frames, use (32mm x 2.3mm Hardie™ Drive Nails.
Termination:
When HardieFlex® NexGen™ boards are fastened adjacent to different materials, leave a gap equal to the thickness of the board and fill the gap with PU sealant.
Control Joints:
Control joints are required in long runs of HardieFlex® NexGen™ boards in both directions.
Table 2: Maximum SPan of Control Joints | ||
Metal Thickness | Control Joint | |
Steel | 0.5 to <0.8mm BMT | 9m |
0.5 to 1.5mm BMT | 6m | |
Timber | 7.2m | |

Jointing:
James Hardie recommends that all edges should be supported by the frame to give a tidier and firmer result. Use factory-cut ends where possible.
Painting:
Before applying any paint finish, remove any sanding dust and ensure the surface is ready for paint application. Refer to the paint manufacturer for paint application. Coating should be completed within 1 month of sheet installation. Use only quality 100% acrylic/latex paints. Note: The use of ‘sealer coat’ or ‘preparation undercoat’ is recommended prior to applying at least two coats of latex paint.
Glancing Light:
In some instances, due to glancing light, set joints may be noticeable in HardieFlex® NexGen™ boards, especially where paint finishes have a high gloss level. Work closely with your builder or designer to minimize this.
Maintenance:
Regular cleaning and maintenance of the finished surface, joints, junctions, penetrations, etc., must be carried out at regular intervals to keep your HardieFlex® NexGen™ fiber cement ceiling looking their best.
With these installation tips in mind, you're well on your way to creating a stunning and functional ceiling that complements your living space. Stay tuned for more helpful insights and ideas from James Hardie!
Source: PDF Guideline
You might also like…


Subscribe to our Newsletter!
Sign-up now and stay up to date with the latest news, products
and project inspirations!
James Hardie may collect your personal information in accordance with its Collection Statement, Privacy Policy and Terms of Use, and provide it to James Hardie customers who may use it to send inquiries.